Modules in Terraform are self-contained packages of Terraform configurations that are managed as a group. Modules are used to create reusable components in Terraform as well as for basic code organization.
Can find Terraform Module here: Terraform Module Registry
Module basics
Any set of Terraform configuration files in a folder is a module. E.g.,
Create folder layout
1
2
3
4
5
6
7
8
9
10
11
12
├─module
│ └─s3
│ main.tf
│ outputs.tf
│ variables.tf
│ user-data.sh
│
└─qa
└─service
main.tf
outputs.tf
variables.tfCreate a module to set S3
1
2
3
4
5
6
7
# S3
resource "aws_s3_bucket" "terraform_module" {
bucket = "yongfeiuall-terraform-module"
versioning {
enabled = true
}
}Using a module
1
2
3
4
5
6
7
provider "aws" {
region = "ap-northeast-1"
}
module "module-test" {
source = "../../module/s3"
}Run
terraform init,terraform planandterraform applycommands1
2
3
4D:\terraform\ModuleStudy\qa\service>terraform init
Initializing modules...
- module.module-test
Getting source "../../module/s3"
Module inputs
Modules can have input parameters, too. To define them, you use a
mechanism you’re already familiar with: input variables.
Open ‘\module\s3\variables.tf’, and add
1
2
3variable "yongfeiuall_module_bucket" {
description = "The name of the S3 bucket"
}Open ‘\module\s3\main.tf’, and update
1
2
3
4
5
6
7
8# S3
resource "aws_s3_bucket" "terraform_module" {
bucket = "{var.yongfeiuall_module_bucket}"
versioning {
enabled = true
}
}Open ‘\qa\servicemodule\s3\main.tf’, and update
1
2
3
4
5
6
7
8
9provider "aws" {
region = "ap-northeast-1"
}
module "module-test" {
source = "../../module/s3"
yongfeiuall_module_bucket = "yongfeiuall_variable"
}Run
terraform init,terraform planandterraform applycommands
Module outputs
Outputs are a way to tell Terraform what data is important.
Open ‘\module\s3\output.tf’, and add
1
2
3output "s3_bucket_name" {
value = "${aws_s3_bucket.terraform_module.bucket}"
}Open ‘\qa\servicemodule\s3\main.tf’, and update: add a security group, which name is use s3 bucket name.
1
2
3
4
5
6
7
8
9
10
11
12
13
14
15
16
17
18
19
20
21
22
23
24
25
26
27
28
29
30
31
32provider "aws" {
region = "ap-northeast-1"
}
module "module-test" {
source = "../../module/s3"
yongfeiuall_module_bucket = "yongfeiuall_variable"
}
resource "aws_security_group" "http" {
name = "${module.module-test.s3_bucket_name}"
# HTTP access from anywhere
ingress {
from_port = "${var.server_port}"
to_port = "${var.server_port}"
protocol = "tcp"
cidr_blocks = ["0.0.0.0/0"]
}
# Outbound internet access
egress {
from_port = 0
to_port = 0
protocol = "-1"
cidr_blocks = ["0.0.0.0/0"]
}
lifecycle {
create_before_destroy = true
}
}Run
terraform init,terraform planandterraform applycommands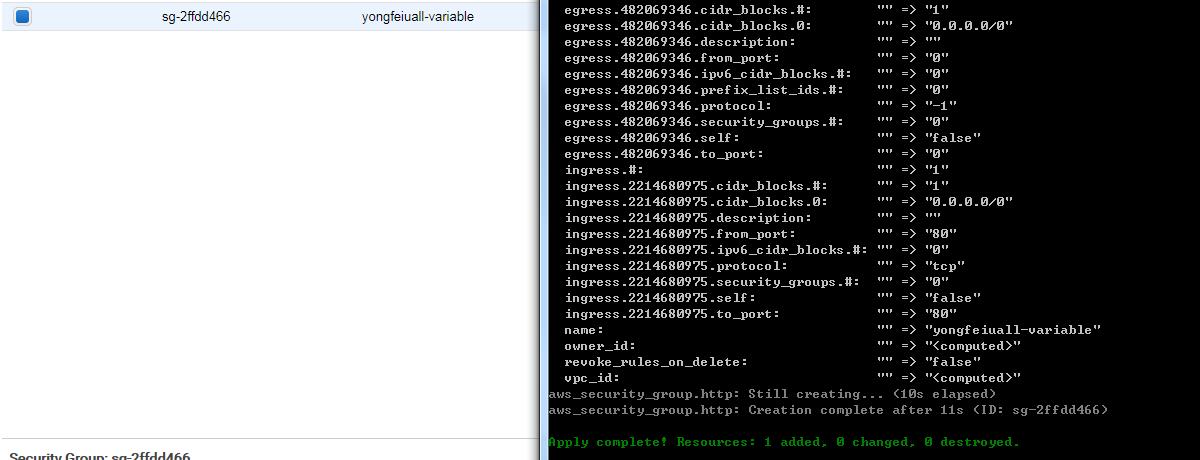
Module versioning
We recommend explicitly constraining the acceptable version numbers for each external module to avoid unexpected or unwanted changes.
Module Repo
instead of using a folder you can use a git repository to version your module.
- Parameters
The URLs for Git repositories support the following query parameters:1
2
3
4# ref - The ref to checkout. This can be a branch, tag, commit, etc.
module "consul" {
source = "git::https://hashicorp.com/consul.git?ref=0.0.2"
Terraform Registry
You can use a specific version for a module if you are using a module registry like the Terraform Registry。1
2
3
4module "consul" {
source = "git::https://hashicorp.com/consul.git"
version = "0.0.2
The Terraform Registry is a public registry. For private use you must use the Private Registry available ine the Enterprise version.
Terrafile
Manages external Terraform modules, controlled by a Terrafile.
Refer here Terrafile for detail infomation.
Module gotchas
File paths
By default, Terraform interprets the path relative to the current working directory. That works if you’re using the file function in a Terraform configuration file that’s in the same directory as where you’re running terraform apply.
You can use path.module to convert to a path that is relative to the module folder.1
2
3
4
5
6data "template_file" "user_data" {
template = "${file("${path.module}/user-data.sh")}"
vars {
}
}