YONGFEIUALL

izheyi.com


  • Home

  • Archives

  • Categories

  • Tags

  • About

  • Search

2018 - 学习计划

Posted on 2018-01-11 | In 随想 |


给自己一个动力,一点压力,希望从各个方面都有一个提升。

读书

今年阅读10本书,不追多,不限书的种类,但是要做到把学到的知识转化为自己的能力,转化为自己的思想。

  1. 每个人都在强调读书的重要性,自己也有所感悟,坚持一年看看到底会有怎样的事情发生。
  2. 家里也有很多一时兴起买的书,消灭掉它们。

工作

  1. 提升工作效率 - 学习方法。
  2. 英语 - Friends continue。
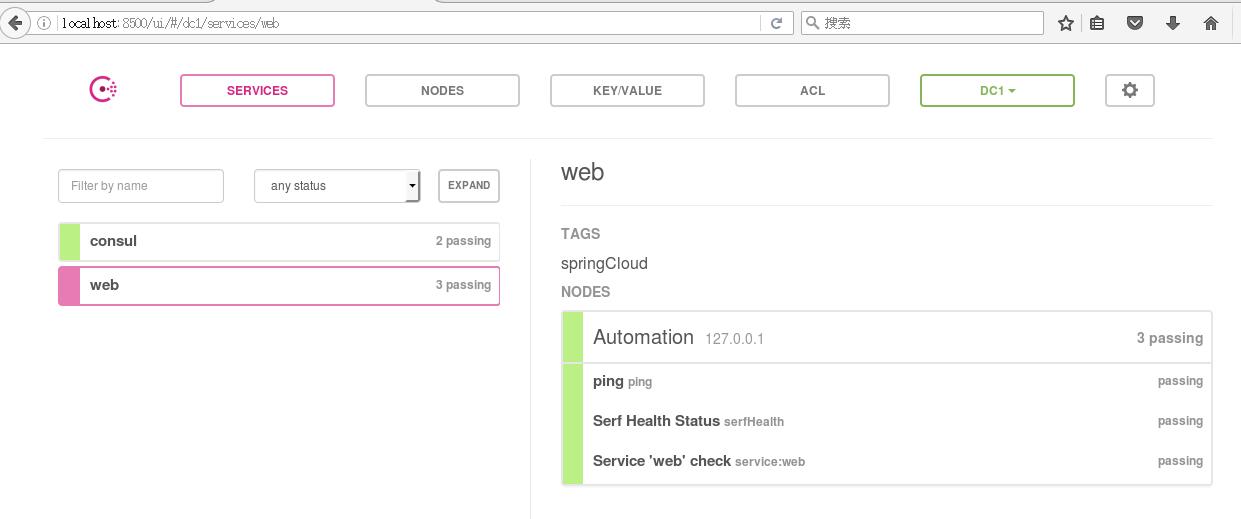
技术

  1. 公司用到的所有环节和相关知识都能掌握。
  2. 从更高的角度去看待技术。

其他

  1. 每周更新一篇Blog,不限内容。
  2. 和闺女好好的 - 脾气。

奖励

  1. 读3本书: 给自己鼓掌点赞。
  2. 读5本书: 家用打印机。
  3. 读10本书: 给自己放假一天。
  4. 所用技术全掌握: 看场话剧或音乐剧。
  5. 都完成: 看一看大海。

Consul - 集群

Posted on 2018-01-01 | In Consul |

搭建集群

Consul推荐在每个数据中心运行3或5个Servers以避免Server失败导致的数据丢失。

基于此,我们先用4个虚拟机来做试验:
|:—IP Address–:|:—–Role—-:|
| 192.168.244.130 | Consul Server |
| 192.168.244.131 | Consul Server |
| 192.168.244.132 | Consul Server |
| 192.168.244.133 | Consul Client |

Server Configuration

1. 生成Key,创建必要配置目录和文件

1
2
3
4
5
6
[root@Automation ~]# mkdir /etc/consul.d/server
[root@Automation ~]# mkdir /etc/consul.d/consul-server-data
[root@Automation consul.d]# ls
consul-server-data ping.json server web.json
[root@Automation consul.d]# consul keygen
Vz3jcuLn6a6Ekq5PbrJO2w==

Key: It should be the same for all the servers and clients in a datacenter. If it’s different the consul members will refuse to join.

2. 创建Configration

1
2
3
4
5
6
7
8
9
10
11
12
13
14
15
16
17
18
{
"bind_addr": "192.168.244.130",
"datacenter": "dc1",
"data_dir": "/etc/consul.d/consul-server-data",
"encrypt": "Vz3jcuLn6a6Ekq5PbrJO2w==",
"log_level": "INFO",
"enable_syslog": true,
"enable_debug": true,
"node_name": "ConsulServer1",
"server": true,
"bootstrap_expect": 3,
"rejoin_after_leave": true,
"retry_join": [
"192.168.244.130",
"192.168.244.131",
"192.168.244.132"
]
}

在每一个Server都要以下相同操作, 唯一要修改的就是IP地址和node_name。

Read more »

Consul - Key/Value和Web UI

Posted on 2017-12-26 | In Consul |

Key/Value

为了提供服务发现以及健康检测,Consul提供了非常容易使用的键/值对存储。

1
2
3
[root@Automation ~]# mkdir test
[root@Automation ~]# consul kv get test/
Error! No key exists at: test/

consul支持http api和consul client进行K/V操作
1.添加: consul kv put [-flags=xx] key value

1
2
3
4
5
6
[root@Automation ~]# consul kv put test/kv 1
Success! Data written to: test/kv
[root@Automation ~]# consul kv put test/kv1 11
Success! Data written to: test/kv1
[root@Automation ~]# consul kv put -flags=21 test/kv2 admin
Success! Data written to: test/kv2

consul支持64位整数的flags表示kv的metadata
2.查询: consul kv get [-deatiled] key

1
2
3
4
5
6
7
8
9
10
[root@Automation ~]# consul kv get test/kv
1
[root@Automation ~]# consul kv get -detailed test/kv
CreateIndex 215
Flags 0
Key test/kv
LockIndex 0
ModifyIndex 695
Session -
Value 1

3.查询所有的key: consul kv get -recurse

1
2
3
4
5
[root@Automation ~]# consul kv get -recurse
test:15
test/kv:1
test/kv1:11
test/kv2:admin

4.删除key: consul kv delete key

1
2
3
4
5
6
[root@Automation ~]# consul kv delete test/kv
Success! Deleted key: test/kv
[root@Automation ~]# consul kv get -recurse
test:15
test/kv1:11
test/kv2:admin

5.前缀匹配删除: consul kv delete -recurse key-prefix

1
2
3
4
[root@Automation ~]# consul kv delete -recurse test
Success! Deleted keys with prefix: test
[root@Automation ~]# consul kv get -recurse
[root@Automation ~]#

6.修改kv

1
2
3
4
5
6
7
8
[root@Automation ~]# consul kv put test new
Success! Data written to: test
[root@Automation ~]# consul kv get test
new
[root@Automation ~]# consul kv put test update
Success! Data written to: test
[root@Automation ~]# consul kv get test
update

Web UI

启动Consul代理并设置 -ui 参数来启动自有主机的界面:
[root@Automation ~]# consul agent -dev -enable-script-checks -ui -config-dir /etc/consul.d

Consul - 服务注册和健康检查

Posted on 2017-12-25 | In Consul |

服务注册

定义一个服务

  1. 为Consul配置创建一个目录/etc/consul.d。Consul装载配置目录中所有的配置文件。[root@Automation bin]# sudo mkdir /etc/consul.d
  2. 我们将创建一个服务定义配置文件。echo '{"service": {"name": "web", "tags": ["rails"], "port": 80}}'>/etc/consul.d/web.json
  3. 用配置目录对数重启代理:
    1
    2
    3
    4
    5
    6
    7
    8
    9
    10
    11
    12
    13
    14
    15
    16
    17
    18
    19
    20
    21
    22
    23
    24
    25
    26
    27
    28
    29
    30
    31
    32
    33
    34
    35
    36
    37
    38
    39
    [root@Automation bin]# curl http://10.24.33.75:8500/v1/catalog/service/web
    curl: (7) couldn't connect to host
    [root@Automation bin]# consul agent -dev -config-dir /etc/consul.d
    ==> Starting Consul agent...
    ==> Consul agent running!
    Version: 'v1.0.2'
    Node ID: '8f55dc0e-5765-5941-e566-5a4f1166645f'
    Node name: 'Automation'
    Datacenter: 'dc1' (Segment: '<all>')
    Server: true (Bootstrap: false)
    Client Addr: [127.0.0.1] (HTTP: 8500, HTTPS: -1, DNS: 8600)
    Cluster Addr: 127.0.0.1 (LAN: 8301, WAN: 8302)
    Encrypt: Gossip: false, TLS-Outgoing: false, TLS-Incoming: false

    ==> Log data will now stream in as it occurs:

    2017/12/25 15:46:02 [DEBUG] Using random ID "8f55dc0e-5765-5941-e566-5a4f1166645f" as node ID
    2017/12/25 15:46:02 [INFO] raft: Initial configuration (index=1): [{Suffrage:Voter ID:8f55dc0e-5765-5941-e566-5a4f1166645f Address:127.0.0.1:8300}]
    2017/12/25 15:46:02 [INFO] raft: Node at 127.0.0.1:8300 [Follower] entering Follower state (Leader: "")
    2017/12/25 15:46:02 [INFO] serf: EventMemberJoin: Automation.dc1 127.0.0.1
    2017/12/25 15:46:02 [INFO] serf: EventMemberJoin: Automation 127.0.0.1
    2017/12/25 15:46:02 [INFO] consul: Adding LAN server Automation (Addr: tcp/127.0.0.1:8300) (DC: dc1)
    2017/12/25 15:46:02 [INFO] agent: Started DNS server 127.0.0.1:8600 (tcp)
    2017/12/25 15:46:02 [INFO] consul: Handled member-join event for server "Automation.dc1" in area "wan"
    2017/12/25 15:46:02 [INFO] agent: Started DNS server 127.0.0.1:8600 (udp)
    2017/12/25 15:46:02 [INFO] agent: Started HTTP server on 127.0.0.1:8500 (tcp)
    2017/12/25 15:46:02 [INFO] agent: started state syncer
    2017/12/25 15:46:02 [WARN] raft: Heartbeat timeout from "" reached, starting election
    2017/12/25 15:46:02 [INFO] raft: Node at 127.0.0.1:8300 [Candidate] entering Candidate state in term 2
    2017/12/25 15:46:02 [DEBUG] raft: Votes needed: 1
    2017/12/25 15:46:02 [DEBUG] raft: Vote granted from 8f55dc0e-5765-5941-e566-5a4f1166645f in term 2. Tally: 1
    2017/12/25 15:46:02 [INFO] raft: Election won. Tally: 1
    2017/12/25 15:46:02 [INFO] raft: Node at 127.0.0.1:8300 [Leader] entering Leader state
    2017/12/25 15:46:02 [INFO] consul: cluster leadership acquired
    2017/12/25 15:46:02 [DEBUG] consul: Skipping self join check for "Automation" since the cluster is too small
    2017/12/25 15:46:02 [INFO] consul: member 'Automation' joined, marking health alive
    2017/12/25 15:46:02 [INFO] consul: New leader elected: Automation
    2017/12/25 15:46:02 [DEBUG] Skipping remote check "serfHealth" since it is managed automatically
    2017/12/25 15:46:02 [INFO] agent: Synced service "web"

你会注意到在输出中”synced service ‘web’”。这意味着代理已经从配置文件中装载了该服务定义,并且已经成功注册该服务到服务目录中。

如果你想注册多个服务,你可以在Consul配置目录中创建多个服务定义文件。

查询服务

这里只试了HTTP API:

1
2
3
4
5
6
7
8
9
10
11
12
13
14
15
16
17
18
19
20
21
22
23
24
25
26
[root@Automation ~]# curl http://localhost:8500/v1/catalog/service/web
[
{
"ID": "8f55dc0e-5765-5941-e566-5a4f1166645f",
"Node": "Automation",
"Address": "127.0.0.1",
"Datacenter": "dc1",
"TaggedAddresses": {
"lan": "127.0.0.1",
"wan": "127.0.0.1"
},
"NodeMeta": {
"consul-network-segment": ""
},
"ServiceID": "web",
"ServiceName": "web",
"ServiceTags": [
"rails"
],
"ServiceAddress": "",
"ServicePort": 80,
"ServiceEnableTagOverride": false,
"CreateIndex": 6,
"ModifyIndex": 6
}
]

Read more »

Consul - 安装运行

Posted on 2017-12-25 | In Consul |

工作中用到Consul,把基本的概念和使用研究一下。

安装

1
2
3
[root@Automation ~]# cd /usr/local/bin
[root@Automation bin]# sudo wget https://releases.hashicorp.com/consul/1.0.2/consul_1.0.2_linux_386.zip
[root@Automation bin]# sudo unzip consul_1.0.2_linux_386.zip

验证:

1
2
3
4
5
6
7
8
9
10
11
12
13
14
15
16
17
18
19
20
21
22
23
24
25
26
[root@Automation bin]# consul
Usage: consul [--version] [--help] <command> [<args>]

Available commands are:
agent Runs a Consul agent
catalog Interact with the catalog
event Fire a new event
exec Executes a command on Consul nodes
force-leave Forces a member of the cluster to enter the "left" state
info Provides debugging information for operators.
join Tell Consul agent to join cluster
keygen Generates a new encryption key
keyring Manages gossip layer encryption keys
kv Interact with the key-value store
leave Gracefully leaves the Consul cluster and shuts down
lock Execute a command holding a lock
maint Controls node or service maintenance mode
members Lists the members of a Consul cluster
monitor Stream logs from a Consul agent
operator Provides cluster-level tools for Consul operators
reload Triggers the agent to reload configuration files
rtt Estimates network round trip time between nodes
snapshot Saves, restores and inspects snapshots of Consul server state
validate Validate config files/directories
version Prints the Consul version
watch Watch for changes in Consul

运行代理

在Consul安装完成后,要先运行代理。该代理可以以服务器或者客户端模式运行。每个数据中心必须有至少一个服务器,不过一个集群推荐3或5个服务器。

启动代理

通过Docke启动Consul容器

1
2
3
4
5
6
7
8
9
10
11
12
13
14
15
16
[root@Automation bin]# consul agent -dev
==> Starting Consul agent...
==> Consul agent running!
Version: 'v1.0.2'
Node ID: 'a1ed3e1e-d9b2-579b-bdcc-d6fb13a2b3e3'
Node name: 'Automation'
Datacenter: 'dc1' (Segment: '<all>')
Server: true (Bootstrap: false)
Client Addr: [127.0.0.1] (HTTP: 8500, HTTPS: -1, DNS: 8600)
Cluster Addr: 127.0.0.1 (LAN: 8301, WAN: 8302)
Encrypt: Gossip: false, TLS-Outgoing: false, TLS-Incoming: false

==> Log data will now stream in as it occurs:

2017/12/25 15:25:25 [DEBUG] Using random ID "a1ed3e1e-d9b2-579b-bdcc-d6fb13a2b3e3" as node ID
2017/12/25 15:25:25 [INFO] raft: Initial configuration (index=1): [{Suffrage:Voter ID:a1ed3e1e-d9b2-579b-bdcc-d6fb13a2b3e3 Address:127.0.0.1:8300}]

集群成员

在另一个终端中运行 consul members ,你能看到Consul集群所有的节点。

1
2
3
/ # consul members
Node Address Status Type Build Protocol DC Segment
fd383e11f665 127.0.0.1:8301 alive server 1.0.2 2 dc1 <all>

停止代理

这个比较容易,Ctrl+C就搞定了。

工作十年感想

Posted on 2017-12-24 | In 随想 |


来北京十年了,也没能混出别人眼中所谓的人模狗样,但话说回来为什么要活给别人看呢。经历了找工作时的彷徨,闺女出生生病的无助,买房和孩子上学的纠结……但这一路走来更多的是幸运,感恩刚来北京管我吃住行的好兄弟,感恩实习就进了知名外企,感恩父母和小丁妈一直的支持、付出和理解…….感恩这一路走来所有帮助我的家人和朋友,很享受现在的工作和生活,很知足。

想当初大四上学期期末,就傻了吧唧的带了200块钱一个人就来了,现在给我两万估计也不定有敢来的胆量,吃住行基本都是朋友的,本天真的以为你有需求我会,工作应该好找,找了两周不太行,可能也是因为还没毕业的缘故,妈蛋国内的公司不要我,那我就找个外企的实习生好了,我清楚的记得光面试就4轮,还傻乎乎的问你们实习是给钱的吧@_@我清楚的记得给人要2000人家说我们4000起⊙﹏⊙我记得很清楚2007.12.24圣诞节前夕第一天上班,真正踏入了职场。

朋友和同学都说我运气好,实习都能进外企,相比他们国内正式员工还要高的工资,更让我感到幸运的是,遇见了对的公司和人,教会了我很多东西,什么是专业的做事,什么是做人要低调但做事要适当高调,让自己对职场有了全面的认识,对从事行业有了更系统的学习和认知,感谢相遇,感恩所教!

也许是第一份工作的缘故,虽然中间也换了工作,自己还出去‘瞎搞’了一年,但十年的工作基本都待在了外企,喜欢老外的简单思维,喜欢外企的工作和生活平衡,喜欢外企的更人性化一些。

中间公司因为我通读了一本书而面试通过(看吧,读书的重要性^_^人生本来就是一个厚积薄发的过程),又阴差阳错的接管了自动化,朋友也在技术和思路上给了我很大的帮助,有幸遇见价值观相同的美国boss,还吵吵着说我是典型的美国人。这段时间让我学会了总结,形成自己在测试上的知识体系,同时也试着扩大自己的影响力。

现在的工作也是无心插柳(本来已有Offer),猎头朋友找我,碍于情面,给了简历,这事就成了,更有意思的是我呆了几个月,公司上市,模式变革,在新的岗位上有很多新东西要学(这也是当初选择这儿的原因之一,能让自己在未知的领域有新的成长),时间虽不长却也快两年,也学到了很多,希望自己能在各方面再有一个提升,成就未来更好的自己。

30多岁的我回顾这十年,职场上自己的起点太过幸运,每段经历都能遇见认可自己,给自己很大帮助的领导,中间也迷茫过,也妒忌过,也动摇过,也曾天真的以为优秀的人只比我大几岁,过两年我也可以变成那样。最终还是意识到要一直坚持做自己,不从众,不跟风,去做自己喜欢且对的事,现在回首来时路,这十年来似乎每一步都走对了,但当时的选择只是追随自己内心最真实的想法。虽然不优秀,但一直不甘现状并为之努力。

2017圣诞节小画展

Posted on 2017-12-23 | In 丁丁 |

刚学了几节课,做出来的东西还是不错的。

小朋友画作展示


Consul - 简介

Posted on 2017-12-23 | In Consul |

什么是Consul

Consul是一个服务管理软件,具体请参考Consul
Consul是强一致性的数据存储,使用gossip形成动态集群。它提供分级键/值存储方式,不仅可以存储数据,而且可以用于注册器件事各种任务,从发送数据改变通知到运行健康检查和自定义命令,具体如何取决于它们的输出。

注册服务

一个服务将其位置信息在“中心注册节点”注册的过程。该服务一般会将它的主机IP地址以及端口号进行注册,有时也会有服务访问的认证信息,使用协议,版本号,以及关于环境的一些细节信息。

服务发现

服务发现可以让一个应用或者组件发现其运行环境以及其它应用或组件的信息。用户配置一个服务发现工具就可以将实际容器跟运行配置分离开。常见配置信息包括:ip、端口号、名称等

检查健康

Consul客户端可以提供与给定服务相关的健康检查(Web服务器返回200 ok)或者本地节点(“内存利用率低于90%”)。这些信息可以监控集群的运行情况,并且使访问远离不健康的主机组件。

术语

  • Agent:Agent是长期运行在每个consul集群成员节点上守护进程。通过命令consul agent启动。Agent有client和server两种模式。由于每个节点都必须运行agent,所有节点要么是client要么是server。所有的Agent都可以可以调用DNS或HTTP API,并负责检查和维护服务同步。
  • Client: 客户端可以将所有RPC请求转发到服务器的代理。客户端是相对无状态的。客户端执行的唯一后台活动是LANgossip池。它消耗最小的资源开销和少量的网络带宽。
  • Server: 服务器端是具有扩展的功能的代理,它主要参与维护集群状态,响应RPC查询,与其他数据中心交换WAN gossip ,以及向上级或远程数据中心转发查询。
  • Datacenter: 数据中心的定义似乎是显而易见的,有一些细节是必须考虑的。例如,在EC2,多个可用性区域是否被认为组成了单一的数据中心?我们定义数据中心是在同一个网络环境中——私有的,低延迟,高带宽。这不包括基于公共互联网环境,但是对于我们而言,在同一个EC2的多个可用性区域会被认为是一个的数据中心。
  • Consensus: 意味着leader election协议,以及事务的顺序。由于这些事务是基于一个有限状态机,consensus的定义意味着复制状态机的一致性。
  • Gossip: consul是建立在Serf之上,提供了完成的Gossip协议,用于成员维护故障检测、事件广播。详细细节参见gossip documentation。这足以知道gossip是基于UDP协议实现随机的节点到节点的通信,主要是在UDP。
  • LAN Gossip:指的是LAN gossip pool,包含位于同一个局域网或者数据中心的节点。
  • WAN Gossip: 指的是WAN gossip pool,只包含server节点,这些server主要分布在不同的数据中心或者通信是基于互联网或广域网的。
  • RPC: 远程过程调用。是允许client请求服务器的请求/响应机制。

架构图

  1. Client和Client之间的LAN Gossip
  2. Client将RPC请求发至Server, Follower Server将请求转发至Leader节点
  3. Server之间的选举行为
  4. Datacenter之间的WAN Gossip

Docker-Machine

Posted on 2017-12-22 | In Docker |

做为Docker容器集群管理三剑客之一的Docker Machine大大简化了Docker主机部署的复杂度,极大的方便了开发者管理分布式Docker环境。

创建本地主机实例

使用virtualbox类型的驱动,创建一台Docker主机,命名为qa。

1
2
3
4
5
6
7
8
9
10
11
12
13
14
15
16
17
18
19
20
21
$ docker-machine.exe create -d virtualbox qa
Running pre-create checks...
Creating machine...
(qa) Copying C:\Users\youfei.hu\.docker\machine\cache\boot2docker.iso to C:\Users\youfei.hu\.docker\mach ine\machines\qa\boot2docker.iso...
(qa) Creating VirtualBox VM...
(qa) Creating SSH key...
(qa) Starting the VM...
(qa) Check network to re-create if needed...
(qa) Windows might ask for the permission to configure a dhcp server. Sometimes, such confirmation windo w is minimized in the taskbar.
(qa) Waiting for an IP...
Waiting for machine to be running, this may take a few minutes...
Detecting operating system of created instance...
Waiting for SSH to be available...
Detecting the provisioner...
Provisioning with boot2docker...
Copying certs to the local machine directory...
Copying certs to the remote machine...
Setting Docker configuration on the remote daemon...
Checking connection to Docker...
Docker is up and running!
To see how to connect your Docker Client to the Docker Engine running on this virtual machine, run: C:\Program Files\Docker Toolbox\docker-machine.exe env qa

验证创建成功

1
2
3
4
5
$ docker-machine.exe ls
NAME ACTIVE DRIVER STATE URL SWARM DOCKER ERRORS
default - virtualbox Running tcp://192.168.99.100:2376 v17.09.1-ce
qa - virtualbox Running tcp://192.168.99.102:2376 v17.09.1-ce
test - virtualbox Running tcp://192.168.99.101:2376 v17.09.1-ce

Docker - Repository

Posted on 2017-12-09 | In Docker |

Docker 仓库用来保存镜像,可以理解为代码控制中的代码仓库。

公有仓库

Docker官方的一个公共仓库Docker Hub

可以注册登录,去进行仓库的管理。也可以通过命令行的交互方式进行登录管理。

私有仓库

Dockers不仅提供了一个中央仓库,同时也允许我们使用registry搭建本地私有仓库。
‘docker-registry’是官方提供的工具,可以用于构建私有的镜像仓库。

安装运行docker-registry

  1. 下载resistry镜像

    1
    2
    3
    4
    5
    6
    7
    8
    9
    10
    docker@default:~$ docker image pull registry
    Using default tag: latest
    latest: Pulling from library/registry
    ab7e51e37a18: Pull complete
    c8ad8919ce25: Pull complete
    5808405bc62f: Pull complete
    f6000d7b276c: Pull complete
    f792fdcd8ff6: Pull complete
    Digest: sha256:9d295999d330eba2552f9c78c9f59828af5c9a9c15a3fbd1351df03eaad04c6a
    Status: Downloaded newer image for registry:latest
  2. 启动容器

    1
    2
    3
    4
    5
    docker@default:~$ docker container run -d -p 5000:5000 registry
    36eddf7acb88e4cc3972c7070ef00d444930ff099dce6e150e504849a429e595
    docker@default:~$ docker container ls -a
    CONTAINER ID IMAGE COMMAND CREATED STATUS PORTS NAMES
    36eddf7acb88 registry "/entrypoint.sh /e..." 15 seconds ago Up 14 seconds 0.0.0.0:5000->5000/tcp nifty_jackson

默认情况下,会将仓库存放于容器内的/tmp/registry目录下,这样如果容器被删除,则存放于容器中的镜像也会丢失,所以我们一般情况下会指定本地一个目录挂载到容器内的/tmp/registry下,如下:

1
docker container run -d -p 5000:5000 -v /opt/data/registry:/tmp/registry registry

私有仓库管理

  1. 上传
    a. 这里用’hello-world’做例子(已经下载了在本地)。
    b. 接着修改一下此镜像的Tag(格式:docker tag IMAGE[:TAG] [REGISTRY_HOST[:REGISTRY_PORT]/]REPOSITORY[:TAG]):
    在一个Server上做的测试,所以Host是本机

    1
    2
    3
    4
    5
    docker@default:~$ docker image tag hello-world 127.0.0.1:5000/hello-world:v5
    docker@default:~$ docker image ls -a
    REPOSITORY TAG IMAGE ID CREATED SIZE
    127.0.0.1:5000/hello-world v5 f2a91732366c 2 weeks ago 1.85kB
    hello-world latest f2a91732366c 2 weeks ago 1.85kB

    c. 接下来把打了tag的镜像上传到私有仓库。

    1
    2
    3
    4
    docker@default:~$ docker image push 127.0.0.1:5000/hello-world
    The push refers to a repository [127.0.0.1:5000/hello-world]
    f999ae22f308: Pushed
    v5: digest: sha256:8072a54ebb3bc136150e2f2860f00a7bf45f13eeb917cca2430fcd0054c8e51b size: 524
  2. 搜索
    在Private Registry2中查看或检索Repository或images,将不能用docker search,会报下边的错误

    1
    2
    docker@default:~$ docker search 127.0.0.1:5000/hello-world
    Error response from daemon: Unexpected status code 404

    但通过v2版本的API,我们可以实现相同目的,必须按照IP:port/v2/_catalog格式:

    1
    2
    docker@default:~$ curl 127.0.0.1:5000/v2/_catalog
    {"repositories":["hello-world"]}
  3. 下载
    a. 先删除已有镜像

    1
    2
    3
    4
    5
    6
    docker@default:~$ docker image rm 127.0.0.1:5000/hello-world:v5
    Untagged: 127.0.0.1:5000/hello-world:v5
    Untagged: 127.0.0.1:5000/hello-world@sha256:8072a54ebb3bc136150e2f2860f00a7bf45f13eeb917cca2430fcd0054c8e51b
    docker@default:~$ docker image ls -a
    REPOSITORY TAG IMAGE ID CREATED SIZE
    hello-world latest f2a91732366c 2 weeks ago 1.85kB

    b. 再pull验证

    1
    2
    3
    4
    5
    6
    7
    8
    ocker@default:~$ docker image pull 127.0.0.1:5000/hello-world:v5
    v5: Pulling from hello-world
    Digest: sha256:8072a54ebb3bc136150e2f2860f00a7bf45f13eeb917cca2430fcd0054c8e51b
    Status: Downloaded newer image for 127.0.0.1:5000/hello-world:v5
    docker@default:~$ docker image ls -a
    REPOSITORY TAG IMAGE ID CREATED SIZE
    127.0.0.1:5000/hello-world v5 f2a91732366c 2 weeks ago 1.85kB
    hello-world latest f2a91732366c 2 weeks ago 1.85kB
1…181920…40
唐胡璐

唐胡璐

i just wanna live while i am alive

393 posts
42 categories
74 tags
RSS
LinkedIn Weibo GitHub E-Mail
Creative Commons
© 2022 唐胡璐
Powered by Hexo
|
Theme — NexT.Pisces v5.1.4