介绍
Spring Boot简化了基于Spring的应用开发,你只需要”run”就能创建一个独立的,产品级别的Spring应用。话不多说,直接参见官网Spring Boot
环境
安装JDK
java -version- 检查Java安装
安装后添加环境变量。安装Maven
我的是Windows,方法如下:
Adding to PATH: Add the unpacked distribution’s bin directory to your user PATH environment variable by opening up the system properties (WinKey + Pause), selecting the “Advanced” tab, and the “Environment Variables” button, then adding or selecting the PATH variable in the user variables with the value C:\Program Files\apache-maven-3.5.0\bin. The same dialog can be used to set JAVA_HOME to the location of your JDK, e.g. C:\Program Files\Java\jdk1.7.0_51
Open a new command prompt (Winkey + R then type cmd) and run mvn -v to verify the installation.新建文件夹作为Project根目录,创建POM
1
2
3
4
5
6
7
8
9
10
11
12
13
14
15
16
17
18
19
20
21
22
23
24
25
26
27
28
29
30
31
32
33
34
35
36
37
38
39
40
41
42
43
44
45
46
47
48
49
50
51
52
53
54
55
56
57
58
<?xml version="1.0" encoding="UTF-8"?>
<project xmlns="http://maven.apache.org/POM/4.0.0" xmlns:xsi="http://www.w3.org/2001/XMLSchema-instance"
xsi:schemaLocation="http://maven.apache.org/POM/4.0.0 http://maven.apache.org/xsd/maven-4.0.0.xsd">
<modelVersion>4.0.0</modelVersion>
<groupId>com.example</groupId>
<artifactId>myFirstproject</artifactId>
<version>0.0.1-SNAPSHOT</version>
<!-- Inherit defaults from Spring Boot -->
<parent>
<groupId>org.springframework.boot</groupId>
<artifactId>spring-boot-starter-parent</artifactId>
<version>1.4.0.BUILD-SNAPSHOT</version>
</parent>
<!-- Add typical dependencies for a web application -->
<dependencies>
<dependency>
<groupId>org.springframework.boot</groupId>
<artifactId>spring-boot-starter-web</artifactId>
</dependency>
</dependencies>
<!-- Package as an executable jar -->
<build>
<plugins>
<plugin>
<groupId>org.springframework.boot</groupId>
<artifactId>spring-boot-maven-plugin</artifactId>
</plugin>
</plugins>
</build>
<!-- Add Spring repositories -->
<!-- (you don't need this if you are using a .RELEASE version) -->
<repositories>
<repository>
<id>spring-snapshots</id>
<url>http://repo.spring.io/snapshot</url>
<snapshots><enabled>true</enabled></snapshots>
</repository>
<repository>
<id>spring-milestones</id>
<url>http://repo.spring.io/milestone</url>
</repository>
</repositories>
<pluginRepositories>
<pluginRepository>
<id>spring-snapshots</id>
<url>http://repo.spring.io/snapshot</url>
</pluginRepository>
<pluginRepository>
<id>spring-milestones</id>
<url>http://repo.spring.io/milestone</url>
</pluginRepository>
</pluginRepositories>
</project>
编写代码
为了完成应用程序,我们需要创建一个单独的Java文件。Maven默认会编译 src/main/java 下的源码,所以你需要创建那样的文件结构,并添加一个名为 src/main/java/FirstExample.java 的文件:1
2
3
4
5
6
7
8
9
10
11
12
13
14
15
16
17
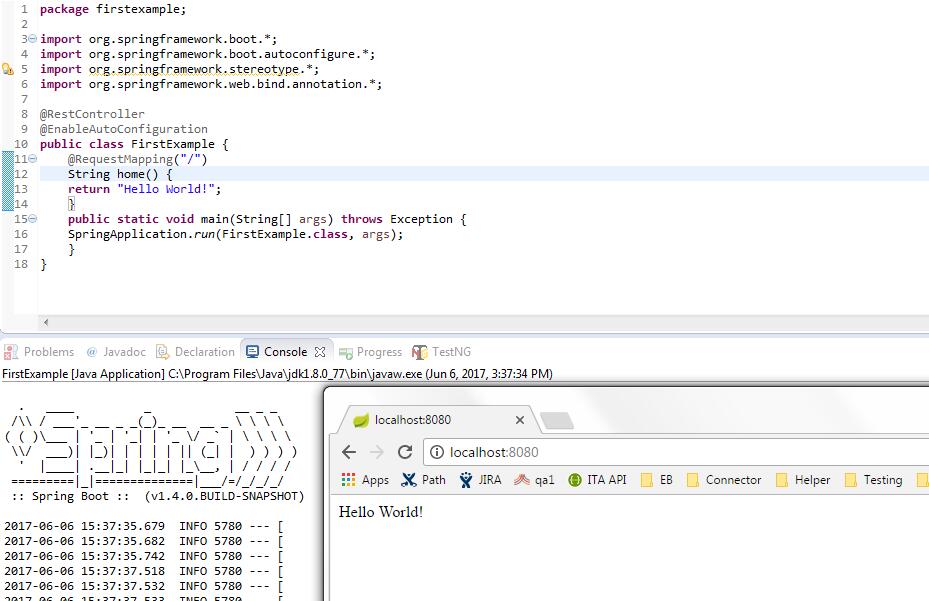
18package firstexample;
import org.springframework.boot.*;
import org.springframework.boot.autoconfigure.*;
import org.springframework.stereotype.*;
import org.springframework.web.bind.annotation.*;
@RestController
@EnableAutoConfiguration
public class FirstExample {
@RequestMapping("/")
String home() {
return "Hello World!";
}
public static void main(String[] args) throws Exception {
SpringApplication.run(FirstExample.class, args);
}
}运行
导入工程到Eclipse,运行Maven Install,成功后,运行项目,
启动之后就可以访问了,默认地址: http://localhost:8080/